Okay, mama’s, let’s talk about sugar and smiles! I’m excited to share one of my favorite treats that always bring joy to my family: Homemade Cake Pops. These little balls of deliciousness are surprisingly simple to make, even with a toddler hanging on your leg. I first made these for my daughter Sarah’s 5th birthday party, and let’s just say, the store-bought ones never tasted the same again! They are so easy to customize for any occasion. I’m telling you, fellow kitchen warriors, this recipe is about to become your new go-to for parties, holidays, or even a “just because we deserve it” treat.
I know what you’re thinking: “Another complicated recipe I don’t have time for?” Trust me, these Homemade Cake Pops are easier than they look, and I’m here to guide you through every step of the way. So, grab your aprons, and let’s get started!
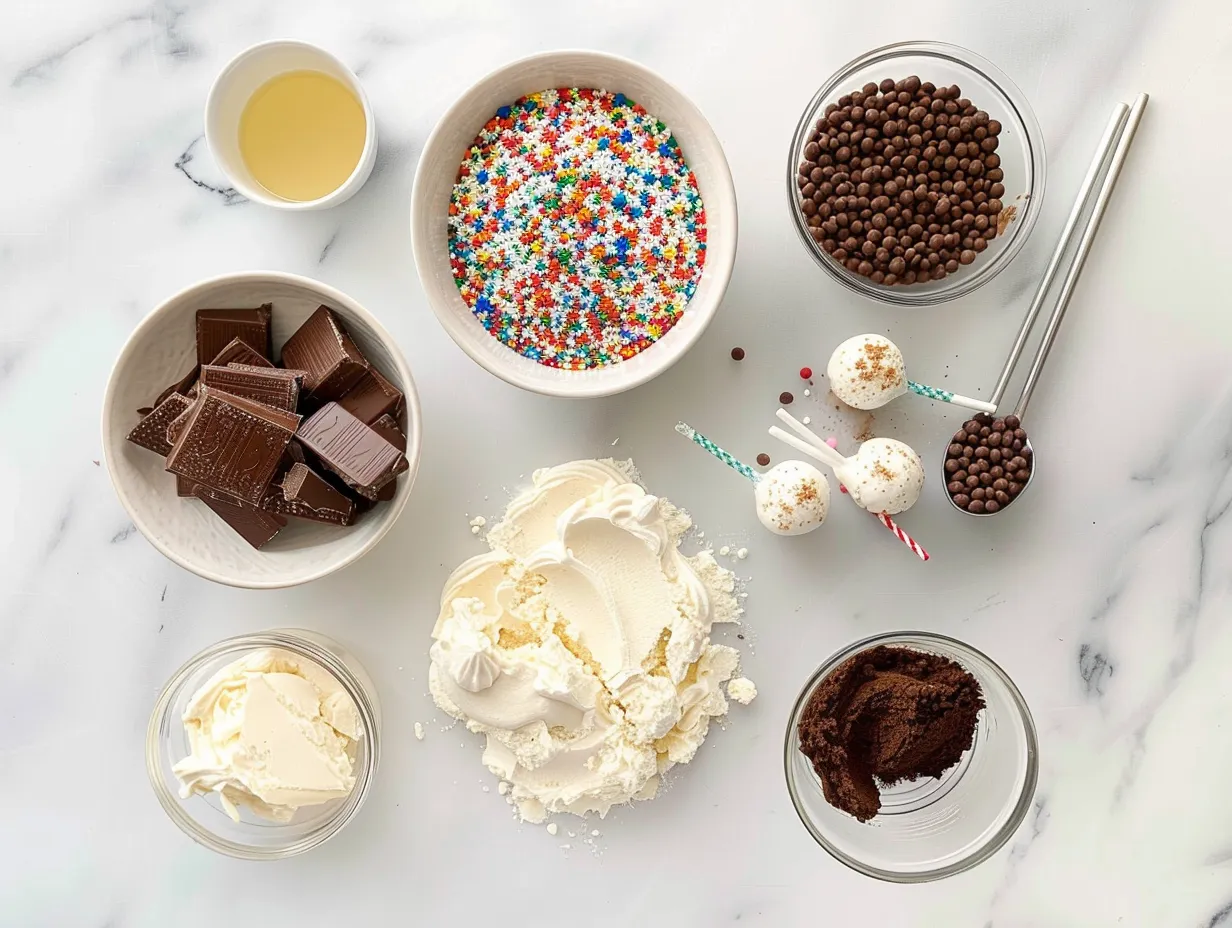
INGREDIENTS You’ll Need:
- 1 box cake mix (any flavor)
- 1 can of frosting (flavor to match cake mix)
- Candy melts (any color)
- Lollipop sticks
- Sprinkles or other decorations (optional)
- Vegetable oil (as called for on cake mix box)
- Eggs (as called for on cake mix box)
- Water (as called for on cake mix box)
Trust me, this Homemade Cake Pops ingredient list is SHORT because mama doesn’t have time for fancy! You can use any cake mix flavor you like, but chocolate and vanilla are always a hit with my kiddos.
No worries if you don’t have a specific brand of cake mix or frosting. I’ve used store brands many times, and they work just as well in this cake pop recipe. This Homemade Cake Pops doesn’t have to break the bank! You can grab all the ingredients at Walmart while doing your regular grocery run. I always stock up on extra candy melts when they’re on sale, just in case of a Homemade Cake Pops emergency.
Here’s a Homemade Cake Pops trick that saved my sanity: if you’re short on time, bake the cake a day ahead. Just let it cool completely, wrap it tightly in plastic wrap, and store it at room temperature. When you’re ready to make the Homemade Cake Pops, simply crumble it up and continue with the recipe. My family loves when I add extra sprinkles to the cake pop decorations – they make everything more fun!
Let’s Make it Happen!
- First, bake the cake according to the instructions on the box. Let it cool completely. Perfect time to fold that laundry pile! In my chaotic kitchen, this Homemade Cake Pops usually takes about 30 minutes to bake, plus cooling time.
- Once the cake is completely cool, crumble it into a large bowl. I usually use my hands for this part – it’s strangely therapeutic! Make sure there are no large chunks of cake remaining. This is a great way to get the kids involved, too (just be prepared for some taste-testing!).
- Add the entire can of frosting to the crumbled cake. Now, mix it all together until it forms a dough-like consistency. You might need to use your hands for this part, too. Don’t panic if your Homemade Cake Pops looks a little messy – it’s all part of the process!
- Roll the cake mixture into small balls, about 1-inch in diameter. Place them on a baking sheet lined with parchment paper. This easy cake pops process can be a bit time-consuming, but it’s worth it in the end. While your Homemade Cake Pops are doing its thing, pour yourself that well-deserved coffee!
- Melt the candy melts according to the package instructions. I usually melt them in the microwave in 30-second intervals, stirring in between, to avoid burning. Your cake pop coating should be smooth and creamy.
- Dip the tip of a lollipop stick into the melted candy and then insert it into one of the cake balls. This helps the stick stay in place. Repeat with all the cake balls.
- Dip each cake ball into the melted candy, coating it completely. Tap off any excess candy. Here’s where I used to mess up my Homemade Cake Pops – don’t make my mistake! Make sure the candy coating is warm and not too thick.
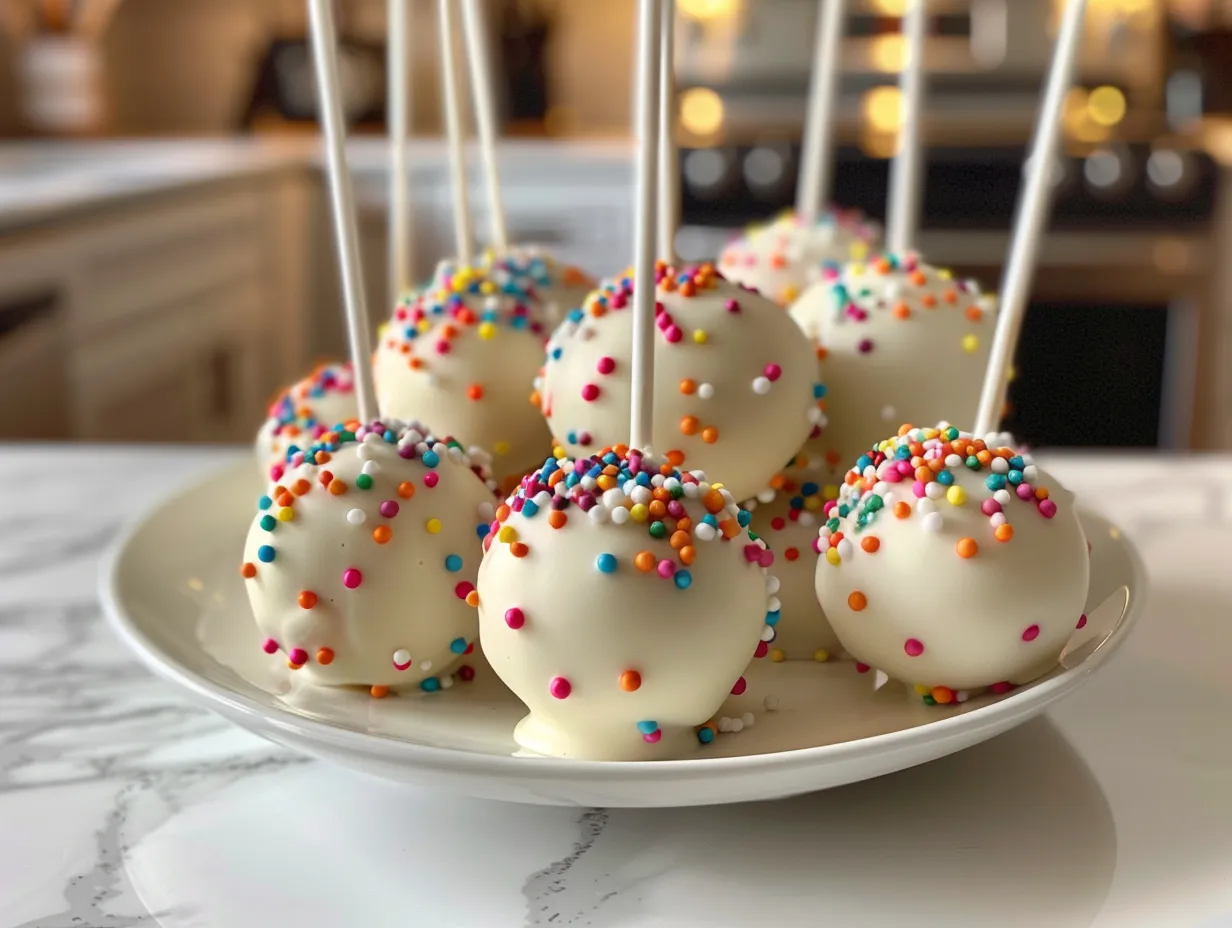
- Immediately add sprinkles or other cake pop decorations before the candy coating sets. This is the fun part! Get creative and let your kids help with the decorating.
- Place the finished Homemade Cake Pops back on the parchment-lined baking sheet and let them set completely. You can speed up the process by putting them in the refrigerator for about 15-20 minutes. Your Homemade Cake Pops should smell amazing by now! These Homemade Cake Pops are doing their thing!
How We Love to Eat This!
My family loves to eat these Homemade Cake Pops anytime, anywhere! The kids devour this Homemade Cake Pops when I serve it with a glass of cold milk.
These Homemade Cake Pops are perfect for birthday parties, holiday gatherings, or even a simple afternoon treat. I love to make them for school events – they’re always a hit! For a fun presentation, I arrange the Homemade Cake Pops in a Styrofoam block or a cute vase. They look so festive and inviting!
This Homemade Cake Pops is perfect for those crazy weeknight dinners! I often make a batch on the weekend and then surprise the kids with them during the week. I also love to experiment with different flavors and decorations. Sometimes I’ll use chocolate cake with peanut butter frosting and dip them in dark chocolate. Yum! And don’t worry about leftovers – I swear there never are any! If there are, they can be stored in an airtight container at room temperature for a few days.
For more sanity-saving dinner ideas, check out my Cinnamon Roll Honeybun Cheesecake!
FAQs: Your Questions Answered
I know you mamas have questions! Let’s tackle some common Homemade Cake Pops concerns.
- Can my picky eater handle this Homemade Cake Pops?
Absolutely! You can customize the flavors and decorations to suit your picky eater’s preferences. I often make plain vanilla Homemade Cake Pops for my son, who’s not a fan of chocolate.
- What if I burn my Homemade Cake Pops? (Asking for a friend… okay, it was me!)
Don’t worry, we’ve all been there! If you burn the cake, just scrape off the burnt parts before crumbling it. The frosting will help mask any remaining burnt flavor.
- Can I make this Homemade Cake Pops ahead for meal prep?
Yes, you can! You can bake the cake and make the cake balls a day or two in advance. Store the cake balls in an airtight container in the refrigerator until you’re ready to dip them.
- How do I prevent the candy coating from cracking?
Make sure the cake balls are cold and the candy coating is warm but not too hot. Dipping them quickly will also help prevent cracking. According to Easy Cake Pops – Cakes by MK, the temperature of the candy melts is key!
- What if my cake pop recipe is too dry?
Add a little more frosting until the mixture reaches a dough-like consistency. A tablespoon at a time should do the trick.
- My easy cake pops are falling off the sticks! What am I doing wrong?
Make sure you dip the tip of the lollipop stick into the melted candy before inserting it into the cake ball. This helps the stick adhere to the cake. You can also try chilling the cake balls for a longer period of time before dipping them. Homemade Cake Pops – Sally’s Baking has some additional tips on this!
- Can I use different types of cake pop frosting?
Definitely! You can use any type of frosting you like, as long as it’s not too runny. Cream cheese frosting, chocolate frosting, or even peanut butter frosting would all be delicious.
Final Thoughts:
Homemade Cake Pops are more than just a treat; they’re a symbol of love and fun in my family. Making them always brings us together, and the smiles on my kids’ faces are priceless. Plus, these Homemade Cake Pops remind me of another family favorite!
Here are my Homemade Cake Pops Mom Hacks:
- Cake Mix Magic: Use different cake mix flavors to create a variety of Homemade Cake Pops.
- Frosting Fusion: Experiment with different frosting flavors to complement the cake.
- Decoration Station: Set up a decorating station with various sprinkles, candies, and edible glitter for a fun family activity.
Here are a few family-tested Homemade Cake Pops variations:
- Chocolate cake with mint frosting and crushed peppermint candies.
- Vanilla cake with strawberry frosting and rainbow sprinkles.
- Red velvet cake with cream cheese frosting and chocolate shavings.
My daughter Sarah loves the vanilla Homemade Cake Pops with rainbow sprinkles, while my son Michael prefers the chocolate ones with crushed peppermint candies. For tips on cake pop frosting – In the Kitch
Remember, mama, don’t be afraid to get creative and make these Homemade Cake Pops your own. I hope you and your family enjoy making and eating these as much as we do. Now go forth and conquer that kitchen!
Homemade Cake Pops
Indulge in the fun and delicious world of homemade cake pops! These bite-sized treats are perfect for parties, holidays, or simply satisfying your sweet tooth.
- Prep Time: 30 minutes
- Cook Time: 30 minutes
- Total Time: 60 minutes
- Yield: 24 cake pops
- Category: Dessert
- Method: Baked
- Cuisine: American
Ingredients
- 1 box (15.25 oz) cake mix (any flavor)
- Ingredients called for on cake mix box (usually eggs, oil, and water)
- 1 can (16 oz) frosting (flavor complementing the cake)
- Candy melts (various colors)
- Lollipop sticks
- Sprinkles (optional)
Instructions
- Bake cake according to package directions in a 9×13 inch pan. Let cool completely.
- Crumble the cooled cake into a large bowl, ensuring no large lumps remain.
- Add the entire can of frosting to the crumbled cake. Mix thoroughly until a dough-like consistency is achieved.
- Roll the cake mixture into small, even balls (about 1-inch in diameter). Place on a baking sheet lined with parchment paper.
- Refrigerate the cake balls for at least 30 minutes to firm up.
- Melt candy melts according to package directions.
- Dip the tip of a lollipop stick into the melted candy and insert into a cake ball. Repeat for all cake balls.
- Dip each cake pop into the melted candy, ensuring it is fully coated. Tap off any excess candy.
- Immediately add sprinkles, if desired, before the candy coating sets.
- Place cake pops in a styrofoam block or on parchment paper to set completely.
Notes
For an extra touch, drizzle melted chocolate or add edible glitter to the cake pops before they set.