Okay, Mom Tribe, let’s talk about something that brings pure joy to my house (and hopefully yours too!): a Homemade Cake Pop Recipe. I know, I know, cake pops can seem intimidating, but trust me, this version is totally doable, even with a toddler clinging to your leg!
Let me tell you, the first time I attempted a Homemade Cake Pop Recipe, it was… well, let’s just say it involved a lot of crumbled cake and a very sticky countertop. It was the summer of ’18, my oldest was obsessed with all things rainbow, and I thought, “Hey, I can totally whip up some Pinterest-worthy rainbow cake pops!” Spoiler alert: I could not. The cake was dry, the frosting was too thin, and the sprinkles ended up everywhere BUT on the cake pops.
But, you know what? My kids still devoured them! And that’s when I realized, it doesn’t have to be perfect to be delicious and fun. So, I tweaked and tested, and now I have a Homemade Cake Pop Recipe that’s relatively foolproof (keyword: relatively!).
This Homemade Cake Pop Recipe is perfect for birthday parties, holidays, or even just a fun weekend activity with the kids. It’s a great way to use up leftover cake, and it’s definitely a crowd-pleaser.
And the best part? It’s totally customizable! You can use any flavor of cake and frosting you like, and decorate them with whatever sprinkles and candies your heart desires. Think of this Homemade Cake Pop Recipe as a blank canvas for your creativity.
This Homemade Cake Pop Recipe has become a go-to in our house. It’s simple enough for me to handle during the week and special enough that the kids look forward to it. It’s really the perfect balance.
I am super excited to share my go-to Homemade Cake Pop Recipe with you all. You’re going to love it.
So, grab your aprons, crank up the music, and let’s get baking! I promise, even if your cake pops aren’t picture-perfect, they’ll still be delicious!
1. Ingredients You’ll Need:
Alright, let’s gather our troops! This Homemade Cake Pop Recipe ingredient list is short and sweet, because mama ain’t got time for complicated!
- 1 box of cake mix (any flavor), baked according to package directions: I usually grab whatever’s on sale. Chocolate, vanilla, funfetti – they all work great!
- 1 container of frosting (any flavor): Again, whatever you like! I’m partial to cream cheese frosting with vanilla cake, but chocolate on chocolate is always a winner, too.
- Candy melts or chocolate chips: For dipping. I usually use white chocolate candy melts, so I can add food coloring to make them extra festive.
- Sprinkles, candies, or other decorations: Get creative! The more colorful, the better.
- Cake pop sticks: You can find these at most craft stores or even in the baking aisle at your local grocery store.
- Vegetable oil or coconut oil: 1 tbsp, if needed, to help melt chocolate smooth

Trust me, this Homemade Cake Pop Recipe ingredient list is customizable. This is the framework, you get to personalize it!
No worries if you don’t have cake pop sticks – I’ve used lollipop sticks and even skewers in a pinch! Just make sure they’re sturdy enough to hold the weight of the cake pop. This Homemade Cake Pop Recipe doesn’t need fancy tools, so don’t sweat it.
You can grab most of these ingredients at Target or Walmart while doing your regular grocery run. This Homemade Cake Pop Recipe doesn’t have to break the bank – use what you have on hand!
Here’s a Homemade Cake Pop Recipe trick that saved my sanity: I bake the cake the day before, so it has plenty of time to cool. Then, I can make the cake pops in stages, whenever I have a few spare minutes. You can also buy a pre-made cake from the store.
My family loves when I add mini chocolate chips to the cake pop mixture – it gives them a little extra chocolatey goodness! This is one of the easy cake pops recipes that are super simple to personalize!
As for storage, any leftover cake pop mixture (if there is any!) can be stored in an airtight container in the fridge for a few days. You can also freeze the finished cake pops for up to a month. Just wrap them individually in plastic wrap to prevent freezer burn.
2. Let’s Make it Happen!
Okay, Mom Tribe, let’s get down to business! Here’s how we turn those simple ingredients into adorable (and delicious) cake pops. This Homemade Cake Pop Recipe is easier than it looks, I promise!
- Crumble the cooled cake into a large bowl: Use your hands or a fork to break it up into fine crumbs. Get the kids involved – they’ll love this part!
- Add the frosting to the crumbled cake: Start with about half the container and mix well. You want the mixture to be moist enough to hold its shape, but not too sticky. Add more frosting as needed.
- Roll the cake mixture into small balls: I usually aim for about 1-inch in diameter. Place the balls on a baking sheet lined with parchment paper.
- Chill the cake balls in the refrigerator for at least 30 minutes: This will help them firm up and prevent them from falling apart when you dip them in the chocolate.
- Melt the candy melts or chocolate chips in a microwave-safe bowl: Heat in 30-second intervals, stirring in between, until smooth. If the chocolate is too thick, add a teaspoon of vegetable oil or coconut oil to thin it out.
- Dip the tip of a cake pop stick into the melted chocolate and insert it into a cake ball: This will help the stick adhere to the cake pop.
- Dip each cake pop into the melted chocolate, swirling to coat completely: Gently tap off any excess chocolate.
- Immediately decorate with sprinkles, candies, or other decorations: The chocolate will set quickly, so you need to work fast!
- Place the decorated cake pops back on the baking sheet and let them set completely: You can speed up the process by placing them in the refrigerator for a few minutes.
Here’s where I used to mess up my Homemade Cake Pop Recipe – don’t make my mistake! I would try to dip the cake pops when they were too warm, and they would fall apart. Make sure they’re nice and cold before you start dipping!
In my chaotic kitchen, this Homemade Cake Pop Recipe usually takes about an hour to make, from start to finish. But honestly, that’s spread out over a few hours, between school pickup and homework help. The cake pop tutorial is simple!
While your Homemade Cake Pop Recipe is chilling, pour yourself that well-deserved coffee! Or, you know, tackle that mountain of laundry. Multi-tasking, mom style!
Your Homemade Cake Pop Recipe should smell amazing by now! That’s how you know you’re on the right track.
Don’t panic if your Homemade Cake Pop Recipe looks a little wonky at first. They don’t have to be perfect to be delicious! Plus, the sprinkles will hide any imperfections.
Here’s a Homemade Cake Pop Recipe shortcut that saves my sanity: I use a spoon to help coat the cake pops in chocolate. It’s less messy than dipping them directly into the bowl!
One time, I accidentally added too much frosting to the cake mixture, and the cake pops were way too sticky. I ended up adding some crushed graham crackers to the mixture to absorb the extra moisture. It worked like a charm!
This Homemade Cake Pop Recipe is meant to be fun! So, don’t stress about making them perfect. Just enjoy the process and let your creativity shine!
3. How We Love to Eat This!
Okay, so now that we’ve got these adorable cake pops, how do we actually enjoy them? This Homemade Cake Pop Recipe is super versatile, so there are tons of ways to serve them up!
The kids devour this Homemade Cake Pop Recipe when I serve it with a glass of cold milk or a scoop of ice cream. It’s the perfect sweet treat after dinner!
This Homemade Cake Pop Recipe is perfect for those crazy weeknight dinners when you just need a little something to brighten everyone’s day. I mean, who can resist a cake pop?
For a fun presentation, I like to stick the cake pops into a piece of Styrofoam covered in decorative paper. It makes them look like a little bouquet of sweetness!
This Homemade Cake Pop Recipe is also great for parties! You can customize the colors and decorations to match the theme. They’re always a hit with kids and adults alike.
As for leftovers (if there are any!), I like to wrap the cake pops individually in plastic wrap and store them in the fridge. They’ll stay fresh for a few days.
During the holidays, I love to make this Homemade Cake Pop Recipe with festive colors and decorations. Red and green sprinkles for Christmas, pastel colors for Easter, and spooky black and orange for Halloween!
One time, I made this Homemade Cake Pop Recipe for a friend’s birthday party, and she was so impressed! She said they were the cutest and most delicious cake pops she had ever seen. It made my day!
My oldest loves when I add edible glitter to the cake pops. It makes them extra sparkly and magical!
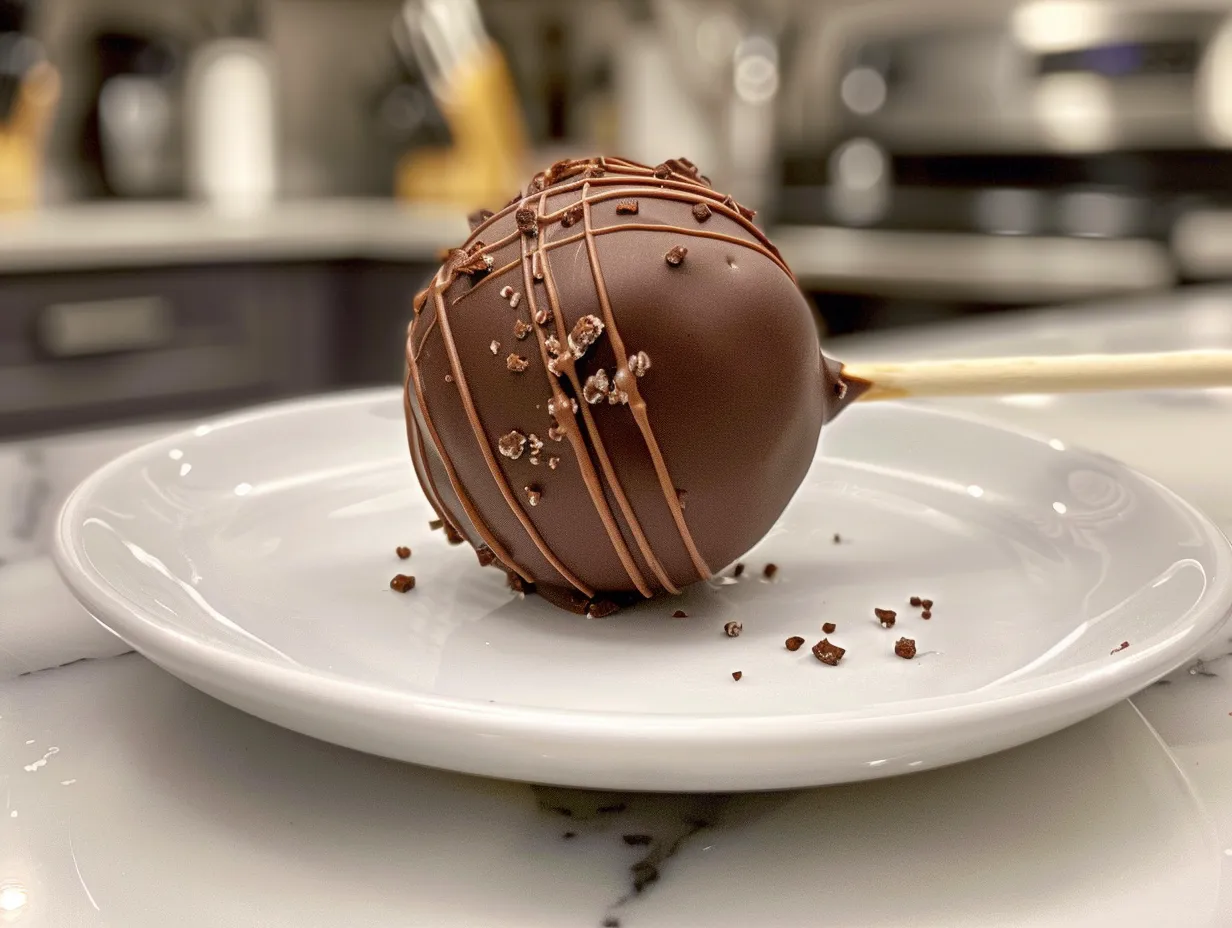
For a grown-up twist, you can dip the cake pops in dark chocolate and sprinkle them with sea salt. The salty-sweet combination is amazing!
If you’re feeling extra fancy, you can drizzle the cake pops with a contrasting color of chocolate. It adds a touch of elegance to this Homemade Cake Pop Recipe.
I also love to serve them up alongside this Cinnamon Roll Honeybun Cheesecake to really impress!
4. FAQs: Your Questions Answered
Okay, Mom Tribe, let’s tackle some of those burning questions you might have about this Homemade Cake Pop Recipe. I know, it can seem a little daunting at first, but trust me, you got this!
Can my picky eater handle this Homemade Cake Pop Recipe?
Absolutely! The beauty of this Homemade Cake Pop Recipe is that you can customize it to your picky eater’s preferences. Use their favorite flavor of cake and frosting, and let them choose their own sprinkles. Sometimes, just letting them be involved in the process can make them more likely to try it!
What if I burn my Homemade Cake Pop Recipe? (Asking for a friend… okay, it was me!)
Okay, we’ve all been there! If you accidentally burn the cake, don’t despair! Just trim off the burnt edges before you crumble it up. The frosting will help to mask any remaining burnt flavor.
Can I make this Homemade Cake Pop Recipe ahead for meal prep?
Yes, you can! As I mentioned before, you can bake the cake the day before and store it in an airtight container. You can also make the cake balls ahead of time and store them in the fridge for a few days. Just make sure to wrap them tightly to prevent them from drying out.
What if my cake pops keep falling off the sticks?
This usually happens if the cake balls are too warm or the chocolate isn’t thick enough. Make sure the cake balls are nice and cold before you start dipping them, and add a little bit of vegetable oil or coconut oil to the melted chocolate to thin it out.
How do I get the chocolate to be smooth and shiny?
The key to smooth and shiny chocolate is to melt it slowly and avoid overheating it. Use a microwave-safe bowl and heat the chocolate in 30-second intervals, stirring in between, until it’s completely melted.
What if I don’t have cake pop sticks?
No problem! You can use lollipop sticks, skewers, or even just toothpicks in a pinch. Just make sure they’re sturdy enough to hold the weight of the cake pop. This is one of the easy cake pops!
Can I freeze the finished cake pops?
Yes, you can! Wrap each cake pop individually in plastic wrap to prevent freezer burn, and store them in the freezer for up to a month. When you’re ready to eat them, let them thaw in the refrigerator for a few hours. This will help you space out each step from this Homemade Cake Pop Recipe.
My family says the cake pops need more flavor!
Consider adding other ingredients to your Homemade Cake Pop Recipe for the cake pop filling, like crushed cookies, chocolate chips, or nuts. You could also use flavored extracts like vanilla, almond, or peppermint.
How can I make these even easier?
This Easy Cake Pops recipe can be simplified even more by buying a pre-made cake from the grocery store. It will save you time baking, and cleanup!
5. Final Thoughts:
So there you have it, Mom Tribe! My go-to Homemade Cake Pop Recipe that’s sure to bring a smile to your family’s faces (and maybe even give you a few minutes of peace and quiet!). This Homemade Cake Pop Recipe is more than just a dessert; it’s a memory in the making. I love making it around the holidays with the family.
This Homemade Cake Pop Recipe is special to my family because it’s something we can all do together. Even my youngest can help with the sprinkling! Plus, it’s a great way to use up leftover cake and avoid food waste.
My Homemade Cake Pop Recipe Mom Hacks:
- Bake the cake ahead of time: This will save you a lot of time and stress on the day you’re making the cake pops.
- Use a cookie scoop to make the cake balls: This will ensure that they’re all the same size and shape.
- Chill the cake balls for at least 30 minutes: This will prevent them from falling apart when you dip them in the chocolate.
Family-Tested Homemade Cake Pop Recipe Variations:
- Chocolate Cake Pops: Use chocolate cake and chocolate frosting, and dip them in dark chocolate. My oldest loves this version!
- Vanilla Cake Pops: Use vanilla cake and vanilla frosting, and dip them in white chocolate. Add a drop of food coloring to the melted chocolate to make them extra festive. This is my personal favorite!
- Funfetti Cake Pops: Use funfetti cake and vanilla frosting, and dip them in white chocolate. Add lots of colorful sprinkles! My youngest adores this version!
Don’t be afraid to experiment with different flavors and decorations. The sky’s the limit! If you loved this you should also consider trying my Pumpkin Spice Cake Roll or even my Hawaiian Pineapple Carrot Cream Cake
I hope you enjoy this Homemade Cake Pop Recipe as much as my family does! Remember, it doesn’t have to be perfect to be delicious. Just have fun and let your creativity shine!
I found a few more useful resources for you as well! Check out Homemade Cake Pops – Sally’s Baking, Easy Cake Pops – Cakes by MK, and Easy Cake Pop Recipe – I Heart Naptime to gain some extra wisdom!
And if you mess up, remember, everyone messes up! Making easy cake pops is as much about the experience as it is the outcome. Just enjoy the process!
You got this, Mom Tribe! Now go forth and conquer those cake pops! And don’t forget to share your creations with me – I can’t wait to see what you come up with! This Homemade Cake Pop Recipe is a game changer!
Homemade Cake Pop Recipe

Indulge in the delightful sweetness of homemade cake pops! These bite-sized treats are perfect for parties, celebrations, or a fun baking project.
- Prep Time: 20 minutes
- Cook Time: 30 minutes
- Total Time: 50 minutes
- Yield: 24 cake pops
- Category: Dessert
- Method: Baked
- Cuisine: American
Ingredients
- 1 box (15.25 oz) cake mix (any flavor)
- Ingredients called for on cake mix box (usually oil, eggs, and water)
- 1 can (16 oz) frosting (any flavor)
- 12 oz candy melts (any color)
- Lollipop sticks
- Sprinkles or other decorations (optional)
Instructions
- Bake cake according to package directions and let cool completely.
- Crumble the cooled cake into a large bowl.
- Add the frosting to the crumbled cake and mix well until fully combined.
- Roll the cake mixture into 1-inch balls. Place on a baking sheet lined with parchment paper.
- Chill the cake balls in the refrigerator for at least 30 minutes.
- Melt the candy melts according to package directions.
- Dip the tip of a lollipop stick into the melted candy and insert it into a cake ball.
- Dip the cake pop into the melted candy, covering it completely. Gently tap off excess candy.
- Immediately decorate with sprinkles or other decorations, if desired.
- Place the cake pop upright in a styrofoam block or on parchment paper to set.
- Refrigerate for 15-20 minutes to allow the candy coating to harden completely.
Notes
For easier dipping, melt the candy melts in a tall, narrow glass or mug. You can also use different flavors of cake and frosting to create unique cake pop combinations.