Okay, mamas, let’s talk about something that’s both delicious and (relatively) easy: Maple Butternut Squash. If you’re anything like me, you’re always on the lookout for ways to get those veggies into your kiddos (and yourself!) without a battle. This Maple Butternut Squash recipe is a winner because it’s naturally sweet and gets even better with a touch of maple syrup.
I first encountered this Maple Butternut Squash at a friend’s Thanksgiving dinner years ago. The aroma alone was enough to draw me in from across the room. The colors of the dish were vibrant and inviting. But the biggest surprise was my kids. They actually asked for seconds!
This Maple Butternut Squash has become a fall and winter staple in our house. It’s the perfect side dish for those nights when you need something comforting but don’t have a ton of time to spend in the kitchen. If you need a fall side dish, this recipe will get your family eating their vegetables in no time!
Feeding a family is beautiful chaos, right? Let’s conquer this Maple Butternut Squash recipe together, kitchen warrior! I’m here to share all my secrets, shortcuts, and even the mistakes I’ve made along the way so you can have a successful (and maybe even enjoyable!) dinner experience. Trust me, if I can do it with three little humans running around my feet, you can too!
INGREDIENTS You’ll Need:
- 1 medium butternut squash, peeled, seeded, and cubed (about 4 cups)
- 2 tablespoons olive oil
- 2 tablespoons pure maple syrup
- 1/2 teaspoon salt
- 1/4 teaspoon black pepper
- Optional: 1/4 teaspoon cinnamon or nutmeg
Okay, fellow kitchen warriors, this Maple Butternut Squash ingredient list is SHORT because mama doesn’t have time for fancy! This recipe truly is a simple way to introduce your family to vegetables.

If you’re thinking, “Ugh, peeling and cubing a butternut squash?”, I get it. You can usually find pre-cut butternut squash at most grocery stores. It’s a total sanity-saver! You can grab it at Target or Walmart while doing your regular grocery run.
No maple syrup? Honey works in a pinch! Or even brown sugar. This Maple Butternut Squash doesn’t have to break the bank. I prefer to use pure maple syrup since it has a richer flavor. If you want to try out something different, make this with pecans for added crunch and flavor.
Sometimes I like to add a pinch of cinnamon or nutmeg for extra warmth. My family loves it when I add extra! And, here’s a mom hack: if you end up with leftovers, store them in an airtight container in the fridge for up to 3 days. They reheat beautifully.
Trust me, this Maple Butternut Squash recipe is super flexible, so don’t be afraid to play around with it!
Let’s Make it Happen!
- Preheat your oven to 400°F (200°C). Line a baking sheet with parchment paper for easy cleanup. Because let’s be real, less dishwashing is always a win!
- In a large bowl, toss the cubed butternut squash with olive oil, maple syrup, salt, and pepper. Make sure every piece is coated evenly. I find that using my hands is the best way to do this.
- Spread the maple glazed butternut squash in a single layer on the prepared baking sheet. Avoid overcrowding the pan. This allows the squash to roast properly and get those delicious caramelized edges. Here’s where I used to mess up my Maple Butternut Squash – don’t make my mistake!
- Roast for 20-25 minutes, flipping halfway through, or until the squash is tender and slightly caramelized. In my chaotic kitchen, this Maple Butternut Squash usually takes closer to 30 minutes. Every oven is different! Your roasted butternut squash should smell amazing by now.
- Test for doneness by piercing a piece of squash with a fork. It should be soft and easily pierced. Don’t panic if your Maple Butternut Squash looks a little dark around the edges – that’s just the maple syrup caramelizing, and it tastes amazing!
- Remove from the oven and let it cool slightly before serving. While your Maple Butternut Squash is doing its thing, pour yourself that well-deserved coffee!
And there you have it! A simple, delicious, and family-friendly Maple Butternut Squash recipe. It’s easier than you think!
How We Love to Eat This!
My family devours this Maple Butternut Squash when I serve it with roasted chicken or pork chops. It’s also a great vegetarian option alongside a hearty salad or some quinoa. The sweetness of the squash pairs perfectly with savory dishes.
This Maple Butternut Squash is perfect for those crazy weeknight dinners when you need something quick and easy. I’ve even made it ahead of time and reheated it for an even faster meal.
I also love to serve this Maple Butternut Squash during the holidays. It’s a beautiful and flavorful addition to any Thanksgiving or Christmas spread. Plus, it’s always a hit with guests – even the picky eaters! My mother in law will be thrilled when I serve this. It might even become a holiday staple like this maple glazed winter squash recipe!
For a fun twist, try adding a sprinkle of toasted pecans or walnuts before serving. And, of course, leftovers are fantastic in salads, grain bowls, or even as a side for lunch the next day.
If you want to take things to the next level, consider making a butternut squash recipe that involves this amazing ingredient! I have just the recommendations for you. Check out this delicious Butternut Squash Soup, or if you like pasta, I also recommend Butternut Squash Gnocchi with Sausage. These two recipes may just change the way you feel about using this delicious vegetable!
FAQs: Your Questions Answered
- Can my picky eater handle this Maple Butternut Squash? Honestly, it depends on the picky eater! The natural sweetness of the squash combined with the maple syrup makes it more appealing to kids. Try cutting the squash into fun shapes or serving it with a dip they already love. You could also try serving it with a side they love!
- What if I burn my Maple Butternut Squash? (Asking for a friend… okay, it was me!) We’ve all been there! If the squash is just slightly burnt, you can try scraping off the burnt parts. If it’s too burnt to salvage, don’t beat yourself up. Order takeout and try again next time. Maybe you can make a roasted butternut squash with a touch less heat and a shorter bake time.
- Can I make this Maple Butternut Squash ahead for meal prep? Absolutely! Roast the squash as directed and store it in an airtight container in the fridge for up to 3 days. Reheat it in the microwave or oven before serving.
- Can I freeze Maple Butternut Squash? Yes! Once the maple glazed butternut squash is cooked and cooled, you can freeze it in a freezer-safe bag or container for up to 2 months. Thaw it overnight in the fridge before reheating. This is a great way to save on time and effort for your family!
- Can I use a different type of squash? Yes! Acorn squash or sweet potatoes would also work well with this recipe. Just adjust the cooking time as needed.
- What if I don’t have maple syrup? Honey or brown sugar are great substitutes! You can also use a sugar-free maple syrup alternative if you’re watching your sugar intake. It makes this recipe incredibly versatile!
- My squash is too hard to cut! Any tips? Microwaving the whole squash for a few minutes can soften it up and make it easier to cut. Just be careful when handling it after microwaving, as it will be hot!
Final Thoughts:
This Maple Butternut Squash is special to my family because it’s a dish that even my pickiest eater enjoys. It’s also a reminder that healthy food can be delicious and easy to prepare. When I think of this side, I think of family.
Here are my Maple Butternut Squash Mom Hacks:
- Pre-cut squash is your friend!
- Don’t be afraid to experiment with spices.
- Roast a double batch and freeze half for later.
Some family-tested Maple Butternut Squash variations include adding a pinch of chili powder for a spicy kick, tossing in some cranberries for extra sweetness and tartness, or sprinkling with toasted pumpkin seeds for added crunch. My son loves it with chili powder, my daughter loves it with cranberries, and my husband prefers the toasted pumpkin seeds.
Ultimately, I hope you make it your own! Don’t be afraid to experiment with different flavors and ingredients to create a Maple Butternut Squash recipe that your family will love. Remember, cooking should be fun, not stressful. Take a deep breath, put on some music, and enjoy the process.
If you want some more fall side dish ideas, check out this spicy maple-glazed butternut squash recipe! If you’re looking for something a little bit different, this variation is sure to impress your family!

I have all the faith in the world that you will create something delicious and nourishing for your family. So go ahead, kitchen warrior, give this Maple Butternut Squash a try! You’ve got this! 💕
Maple Butternut Squash
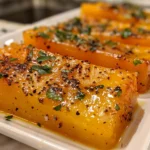
This Maple Butternut Squash is a simple and delicious side dish, perfect for fall! Roasted to perfection with a touch of maple syrup, it’s a healthy and flavorful addition to any meal.
- Prep Time: 15 minutes
- Cook Time: 25 minutes
- Total Time: 40 minutes
- Yield: 4 servings
- Category: Side Dish
- Method: Baked
- Cuisine: American
Ingredients
- 1 medium butternut squash, peeled, seeded, and cubed
- 2 tablespoons olive oil
- 2 tablespoons maple syrup
- 1/2 teaspoon salt
- 1/4 teaspoon black pepper
- Optional: Pinch of cinnamon
Instructions
- Preheat oven to 400°F (200°C).
- In a large bowl, toss butternut squash with olive oil, maple syrup, salt, pepper, and cinnamon (if using).
- Spread squash in a single layer on a baking sheet.
- Roast for 20-25 minutes, or until tender and slightly caramelized, flipping halfway through.
- Serve immediately.
Notes
Serve this Maple Butternut Squash as a side dish with roasted chicken, pork, or vegetarian entrees. A sprinkle of toasted pecans adds a lovely crunch!